COBrA Curation Tool: OBO Explorer
Help Page
Download The OBO Explorer and other OBO Tools can be
downloaded from here:
http://www.aiai.ed.ac.uk/project/cobra-ct/COBrA_downloads.htm.
Installation will be easier if you download the OBO Tools file as it
bundles the OBO Converter with the OBO Explorer.
Install
The OBO tools are Protege plug-ins. If you do not have Protege
installed you need to download and install it, see
http://protege.stanford.edu/download/download.html
On all platforms, the plug-ins are installed by expanding the tar archive
at the top level of the Protege installation directory, e.g. in
/Protege_3.2. The archive will create new directories in
the ./plugins directory. Expand the archive using WinZip, StuffIt,
or at the commandline: tar -xvf obo-tools.tar. The directory structure
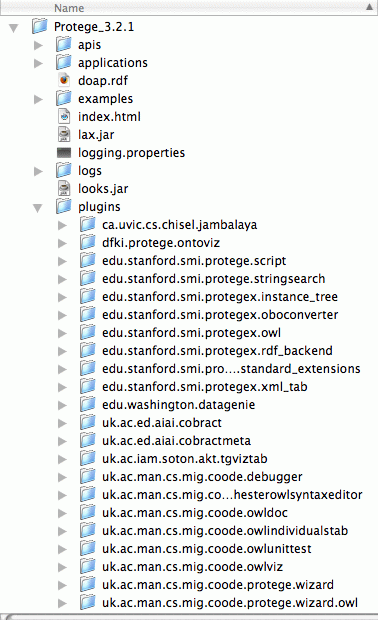
should contain these 3 directories (among others)
/plugins/uk.ac.ed.aiai.cobract
/plugins/uk.ac.ed.aiai.cobractmeta
/plugins/edu.stanford.smi.protegex.oboconverter
|
|
The OBO Explorer requires no further installation, however,
Protege requires Java to run.
Java 1.5 should be installed, see:
http://java.sun.com/j2se/1.5.0/
If you are unsure whether you have the correct version of java, try
typing 'java -version' at the commandline:
java version "1.5.0_06" on OS X or
java version "1.5.0_04" on Linux.
User Guide
Protege must be configured to show the OBO Explorer tab, and this is
done after starting Protege (double-click the Protege icon) and
creating a new Project.
1. Creating a Protege Project
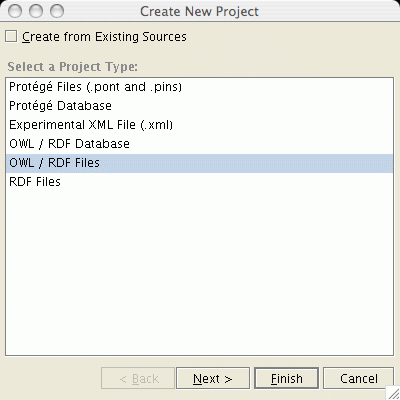
If you plan to open an OBO format file (.obo), begin by creating a new
Project in Protege (see screenshot immediately below) but do not select Create from Existing
Sources (see right), always ensure that
OWL/RDF Files is selected, then simply
click Finish.

|
|
Alternatively, if you want to open an OWL file, proceed as above but
select the Create from Existing
Sources option, click Next, then select the file (see
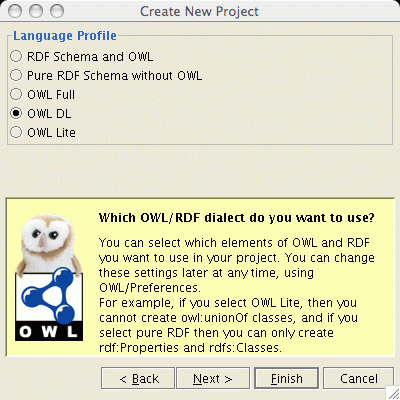
below) and select the language profile
(see right) and click Finish.

|
|
2. Configuration: To show the OBO tools, configure Protege as
follows:
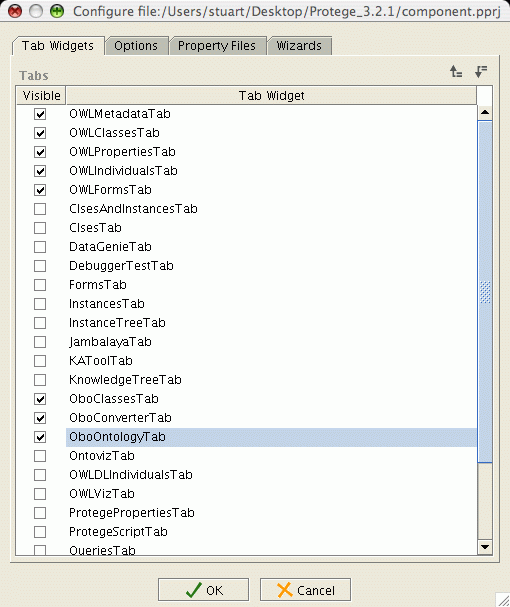
- Under the Project menu, select Configure, then in
the pop-up dialog select the OBO tools:
OboClassesTab,
OboConverterTab and
OboOntologyTab (see right).
- Three tabs titled "OBO Explorer", "OBO Converter" and "OBO
Ontology Metadata" should appear. These are used to load and edit OBO Ontologies.
|
|
3. Loading an OBO format file:
Unless you have loaded an OWL file in step 1:
- Select the OBO Converter tab
- Click OBO Input File and select the file
- Click Start! the interface should look as below
- Click Close and the interface should appear as shown top
right, you can now select the OBO
Explorer tab and edit the
ontology.
- In case of an error (bottom right), try creating a new Protege
Project and repeating the loading
procedure. Errors may occur if you load a
new ontology while an ontology is
already loaded as the new ontology
will be merged with the loaded ontology
- which may not be what you intend.
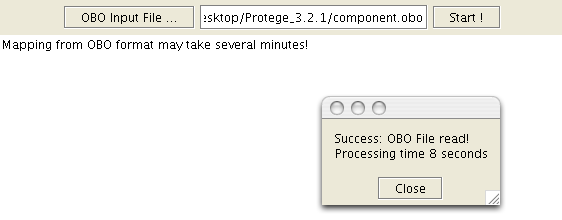
|
Loading completes successfully:
 Loading generates an error:

|
4. Editing: using the OBO Explorer
The OBO Explorer tab provides access to the definitions and
cross-references associated with GO and OBO terms.
For more information about the OBO
format see
http://www.geneontology.org/GO.format.obo-1.0.shtml
Having created a Protege Project and configured Protege to show the
OBO tools, select the
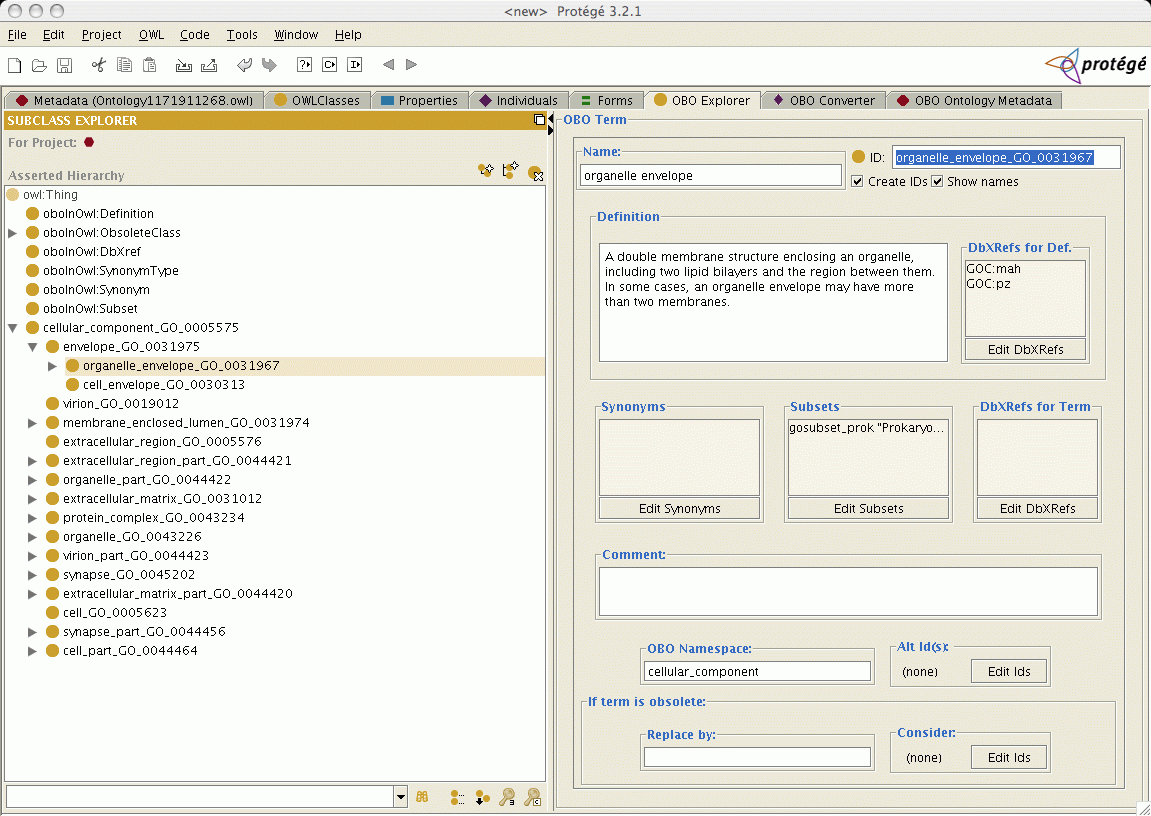
OBO Explorer tab. It should appear as below:
Click to enlarge:
The OBO Explorer stores edits to database cross-references (DbXRefs), synonyms
and IDs automatically, i.e. without a 'commit' action.
Text fields are saved by typing return/newline. Unsaved text is
dispayed in blue.
Note that most text fields in Protege are saved by typing return.
The interface functions as follows:
- Name: the name field displays the name of the OBO term.
Edits to the term name take effect when you type return.
The text colour is black when the edit has been saved.
Should the text colour turn blue, e.g. after adding or deleting a character,
this indicates that the changes are not yet saved.
- ID: in Protege, the term ID is used as the class name. The ID should not be edited. Other Protege
plug-ins may allow the class name to be edited, in which case an edit is confirmed by typing a newline at the
end of the ID.
- Create IDs: Before creating new terms, check this box to create the next ID in the
series. You will be prompted for the ID prefix when the box is checked.
- Show names: Check this box to replace the ID with a new name
that combines the term name and the ID. This makes the class hierarchy
display and other Protege tools more informative. De-select this
option before saving the file.
- Definition: The textual definition of the term is shown in
the Definition panel. Edits to the definition are saved when a newline
is typed, or at the end of a sentence. The text is black when it is
saved, blue indicates unsaved text.
Definitions can have zero, one or more DbXRefs (e.g. citations). Click Edit
DbXRefs to call up the DbXRef editor. To add a new DbXRef, supply
the database name, accession number (and optionally, a description)
and click Add. To modify or to delete an existing DbXRef, first
select it in the list, then click Remove or Delete.
The DbXRef data will be stored as you see it when you click
OK to dismiss the dialog. Note that you cannot select a DbXRef from
the list shown on the main Protege panel.
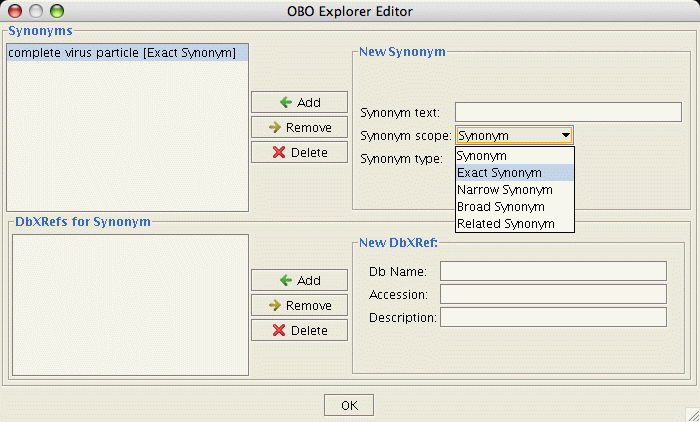
- Synonyms: A term can have zero, one or more synonyms, these
are shown in a list on the Synonyms panel. Click Edit
Synonyms to call up the Synonym editor (above).
Supply the synonym text, and select the scope from Synonym, Exact
Synonym, Narrow Synonym, Broad Synonym, Related Synonym.
You can, optionally, select the synonym type (if any are defined for
the ontology). Use the OBO Ontology Metadata tab to create new synonym
types.
As with DbXRefs, you can Add a new synonym, and after
selecting a synonym from the list you can Remove or
Delete one.
Each synonym can have zero, one or more DbXRefs. It is necessary to click on the
synonym in the synonym list to see the DBXRefs for that synonym in the
DbXRef list below.
The Synonym and DbXRef data will be stored as you see it when you click
OK to dismiss the dialog.
- Subset: A term can belong to zero, one or more subsets.
Click Edit Subsets to call up the Subset editor.
You can Add or Delete subsets once you select one.
Subsets are defined in the OBO Ontology Metadata tab.
- DbXRefs for Term: Database cross-references (DbXRefs) can be
associated with the term itself. Click Edit
DbXRefs to call up the DbXRef editor, and use the editor as
described above.
- Comment: A comment is a text field for notes about the term. As for the Definition field,
comment text is saved at the end of a sentence or when a newline is typed, and blue indicated
unsaved changes.
- Namespace: GO terms have a namespace (not to be confused with an OWL namespace).
This is either molecular_function, biological_process or cellular_component.
- Alt Id(s): Terms can have alternative IDs, click Edit
Ids to call up the editor. IDs are added, removed and deleted as
for synonyms and DbXRefs.
- Obsolete terms: A single Replace by ID can be given for
obsolete terms. A list of Consider IDs can also be
specified. Obsolete terms should be moved to
oboInOwl:ObsoleteClass and should have no links to other terms.
The OBO Explorer does not check that obsolete terms conform to this requirement.
5. Creating new classes
- Create IDs: select the Create IDs option on the OBO
Explorer tab, if you have not already done so, and enter
the ID prefix. This ensures that the next ID in the series will be
used for the new class.

- New subclasses: to create a new subclass, select the parent
class in the class hierarchy (see above) then
either i) click on the icon:
 or
ii) click on the parent class and use the right mouse button to call
up a menu, select the first option Create subclass.
- Define the class: give the class a name and a definition
using the OBO Explorer interface. Add DbXRefs, Synonyms and Subsets to
complete the definition.
6. Properties and Logic
Protege has additional interface components and other powerful features to enable you
to create and reason about OWL ontologies, these user guides will help
you:
http://protege.stanford.edu/doc/users.html
http://protege.stanford.edu/doc/owl/getting-started.html
This page can be found at:
http://www.aiai.ed.ac.uk/project/cobra-ct/tools/oe_help.htm


 or
ii) click on the parent class and use the right mouse button to call
up a menu, select the first option Create subclass.